Making changes to a Jenkins instance that has been around for a while can make even the most experienced developers nervous. Jenkins configurations tend to have a number of things in common:
- They grow massively over time
- Their intent isn’t always clear
- They are often put together by different people at different times
Assumptions
- Your Jenkins server is located at
http://localhost:8080 - Your Jenkins job is named
deploy-prod
Backup Jobs
A reasonable way to deal with this anxiety is to backup the configuration.
Fortunately, that’s easy with Jenkins. Simply point your browser to
http://localhost:8080/job/deploy-prod/config.xml and save the XML (example
below) to disk.
<?xml version='1.0' encoding='UTF-8'?>
<project>
    <actions/>
    <description>deploys to cloud instance</description>
    <keepDependencies>false</keepDependencies>
    <properties/>
    <scm class="hudson.scm.NullSCM"/>
    <canRoam>true</canRoam>
    <disabled>false</disabled>
    <blockBuildWhenDownstreamBuilding>false</blockBuildWhenDownstreamBuilding>
    <blockBuildWhenUpstreamBuilding>false</blockBuildWhenUpstreamBuilding>
    <triggers class="vector"/>
    <concurrentBuild>false</concurrentBuild>
    <builders>
        <hudson.tasks.Shell>
            <command>echo "deploying to prod"</command>
        </hudson.tasks.Shell>
    </builders>
    <publishers/>
    <buildWrappers/>
</project>
Restore Jobs
A backup is only as good as your confidence in restoring it, so it’s a good idea
to take a few minutes before making any of those big changes and see if you can
restore the configuration. I’d suggest changing the description, as it’s a
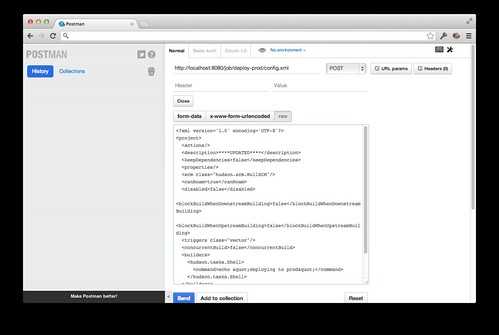
low-risk update that is easily visible. To restore your configuration, you’ll
need a tool like Postman[1],
where you can paste the XML contents in the body and POST to
http://localhost:8080/job/deploy-prod/config.xml
Automate It
This quickly becomes a repetitive and mundane task that is perfect to automate — which is exactly what I’ve done for the grunt JavaScript build tool.
After installing grunt-jenkins[2][3]
from npm, include it in your grunt.js gruntfile
and add the jenkins configuration block:
grunt.initConfig({

    // all your other config

    jenkins: {
        serverAddress: 'http://ci.mycompany.com:8080',
        pipelineDirectory: 'ci' //optional, defaults to 'pipeline'
    }
});
Usage is simple:
grunt jenkins-backup-jobsThis command will contact your Jenkins server, get a list of all the jobs, and
save every configuration to pipeline/job-name/config.xml.
To see how restoring works, make a small change to a job’s description in the XML and run:
grunt jenkins-install-jobsNow check out your change on the Jenkins server. Pipeline configuration instantly has the respect it deserves in your source tree.
- Available for Google Chrome only in the Chrome Web Store.
- grunt-jenkins on github
- grunt-jenkins on npm
